Although he has purchased from us, and used our products (the "Secret Motor Driver") in his prize-winning minisumo "Stinger", we, as Solarbotics officially declare Mr. Hylands only "marginal" friend. You see, Solarbotics sent a few of our robots to the University of Northern Idaho's mail-in minisumo contest, and again he's served our own tuckus back […]
What can you do with a GM15?
Dave Hrynkiw
October 9, 2009
...oh, just save the Republic!
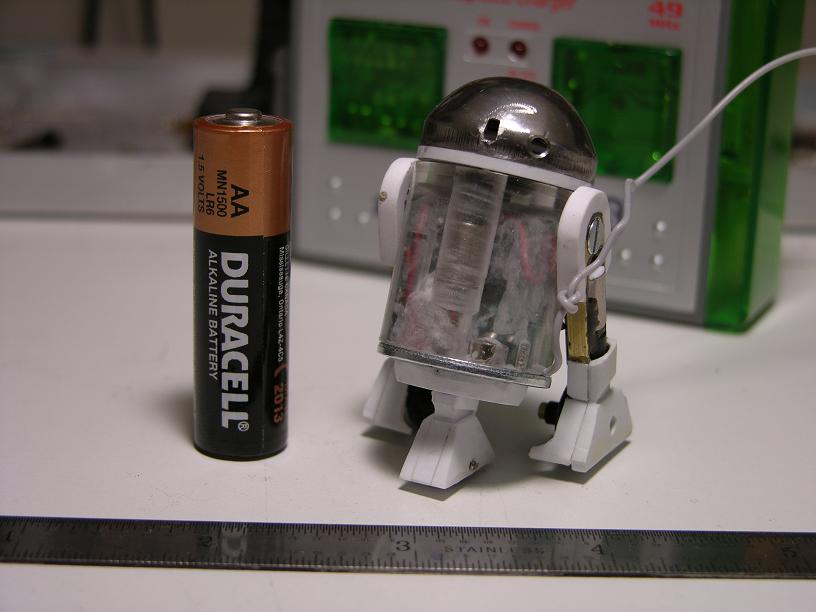
Just got this note in from Rob Meyer, who is using 3 of our GM15 pager gearmotors to drive his 1/18 scale R2-D2.
Given that the real R2-D2 measures 108cm tall, that makes this cute cousin only 6cm (2.36") tall!
There's a GM15 for each of the drive wheels, and another under the dome which belt-drives the dome. You can see the it in this photo in the vertical tube front-middle.
Rob writes:
"Just wanted you to know the GM15 motors you sold me are working great! They allowed me to make my 1:18 scale r/c R2-D2 a reality. It uses two GM15 motors for the drive and one to run the dome. My friends at Astromech.net love it. "
Update!
Just got more details from Rob which he forwarded me from Astromech.net, and a nice breakdown photo of R2-D2's parts:
"I turned the body out of a block of 1" acrylic, then bored holes through the top and base to mount the battery, dome drive motor, circuit board, and bottom plate mounting pins. The bottom plate is based on a steel washer and is held in place by a tiny rare earth magnet.
The legs were built up on sections of 1/4" by 1/8" brass rectangular tubing.
The motors are pager vibrator motors with a 1:25 planetary gearset attached (solarbotics.com). They are some of the most amazing hardware I have come across recently. They are right at 1/4" diameter, so I had to squeeze them into the 1/4" wide leg frames.
The final drive gears consist of sets of standard ring and pinion gears from the back of a slot car. The ring gears double as the drive wheels, and they have small rubber bands glued to their circumference.
The dome is a measuring spoon with the handle cut off and a styrene bottom ring added. Originally I thought it would be a piece of cake to drill the hole for the PSI's and Logics, but turns out it is made of stainless steel, so I ended up breaking six of my tiny drill bits before I learned to grind through the surface with my dremel first before finishing with the drill.
I do intend to add the full suite of dome lighting- PSI's, Logics, and eventually the front HP. I have the LEDS set up on a breadboard and tested running from a surface mount Picaxe 08M. The only thing holding me up on installing them is the power supply. The Blue, Green, and White LED's need 3 volts to run, but everything else on the system is now at 1.5 volts. I have located a 1.5-3.3 volt up-converter chip, but I am waiting for it to arrive.
Finally, the control board and battery came out of a MicroSizers RC car. The tiny little battery takes about 45 seconds to charge and it runs for maybe a few minutes from that. The original car was set up for forward/reverse on the drive motor channel, and left/right steering on the other. The way the receiver's channel outputs were arranged, I could only get one motor to reverse. I adapted the other drive motor to run off the steering outputs, but they were designed to power two seperate electromagnetic coils to steer the car- they would not reverse the motor as such. As it turns out, it was a bonus, because I realized I could sacrifice reverse on one motor and still have full steering. The only thing it will not do is back up in a straight line. I then had the other steering coil output to use for the dome drive. Originally I had the dome just spinning one direction- but then I realized it would be cooler to set up a belt driven crank mechanism so the dome would scan back and forth."
Kudos on a great hack!
MORE POSTS
Back on Track
Hey everyone, while parts of Calgary are still in recovery, things are now back to normal on our end. We're processing and shipping out on schedule, and unless you're in a flood-affected area you'll be receiving your order on time. Thanks for your patience!
GM10 Dimensions
Thanks to Bill Bigge, we've got a PDF dimension drawing of our GM10 gearmotor available for download. Thanks go out to Bill and his ruler! Read More...
Review of SunSeeker Head
Robert Nansel has done it again! He reviewed our SunSeeker head kit and wrote up another great review. We are just beaming with pride (no pun intended), at this article as well. Check out our advertisement in conjunction with the article! Read More...
Solarbotics has been operating for more than 25 years, bringing electronics know-how and supplies to both the electronics professional and hobbyist. We'll be happy to help you too!
Solarbotics, Ltd. is not responsible for misprints or errors on product prices or information. For more information, please see our Terms and Conditions.
Warning: This product contains chemicals known to the State of California to cause cancer and birth defects or other reproductive harm.
Please visit www.P65Warnings.ca.gov for more information. This item was manufactured prior to August 31, 2018.