Although not a true BEAM robot, this simple schematic by Randy Sargent is small, simple, slick, and effective. My own version uses a pair of pager motors and three cells from a 9V rechargeable battery. Hard to get any simpler than this device!
Project (the day other than) Monday: Ice...
Solar botics
December 3, 2014
Inspired by the Ice Bulb published on Instructables, we decided to create our own version. Ice bulb suggests that we use a balloon to shape the ice and before it freezes, add an LED so that it can glow. Since we decided to use a whole bunch of LEDs (on a string), we opted to use a silicon brownie mold for multiple "bulbs" in less conventional shapes instead.
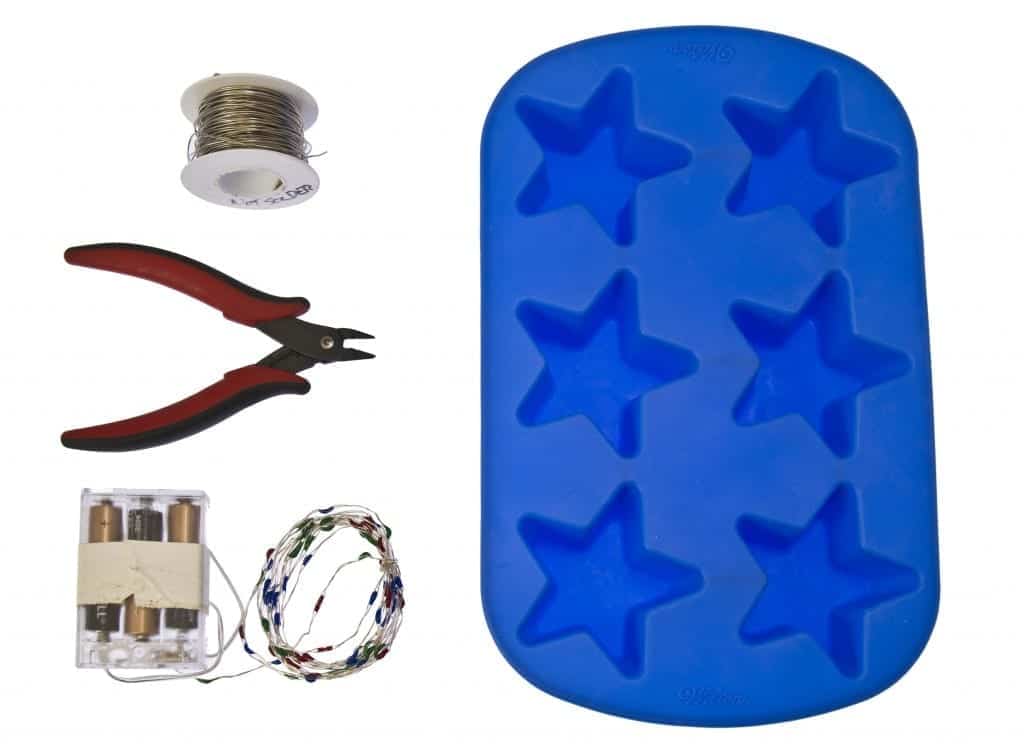
If you decide to try this too, you will need wire cutters, wire, needle, silicone mold, and our 3 meter LED string of any colour (we chose a red-green-blue one). If you are wondering where to find the mold we used, you can find one at your local Michaels. If you can't find a silicone mold, you can try using a metal muffin tin instead but this could cause your ice cubes to crack when they freeze.
 Step 1. Cut seven wire strips, about 2" long. They don't need to be good looking, this is just for holding the LED string down to prevent it from moving around and make sure it freezes in the right position. We found that none of the sticky materials like gaffers tape or packing tape actually stuck to silicone, not to mention holding something in place, so wire will work the best.
Step 2. Bend the wires into a U shape - better to do it beforehand than trying to hold the unruly LED string in place with one hand, wire cutters in other, needle in the third one, and the wire to cut in the fourth. You notice the tendency, right?
Step 3. Do some math to space your LEDs evenly on the string. We decided that we wanted a 5 LED space between our ornaments and on both ends. That means (90-(5 x 7 spaces=35))/6= 9 LEDs per cell.


Step 4. Count out your LEDs for the first cell and wrap them in a loose ball like shown. Hold them in place, make a lead hole in the silicone with a needle and pin the LED string down with your U-shaped wire. Twist it in the back to keep the wire locked in place.

Step 5. Continue until you fill all the cells with the LED string. Make sure to adjust the string so it sits nicely in each cell and does not touch the edges or stick out of the mold.


Step 6. Fill the mold with water: the string is water/weather resistant. If you want the light to be more uniform within the star, cloud some cells with milk or cream (add just a few drops).
Step 7. Now that all the stars are ready, stick them in the freezer for a few hours until they are solid ice. The battery pack should be fine in the freezer as well but just make sure that it isn't resting on anything wet. 
 Step 8. Take out your frozen goodies, power them on and enjoy!
You can also reuse the mold and make multiples - we made a red ornament as well. 
MORE POSTS
New BEP Application 2
We've got a new BEP application ready for you users of the Bicore Experimenters' PCB: The two motor Servocore Walker! Use two unmodified servos to set endstop and duration characteristics, slave them like regular bicores, add an IMx reverser, and you're trotting along!
Solarbotics at Maker Faire Calgary
Are you located in or around Calgary? Do you like cool projects and neat-o people making neat-o things? Are you looking for something mega-awesome to do this weekend? If you answered yes to all (or any) of these questions, we have some good news for you: The Maker Faire Calgary is happening this weekend. There'll be lots […]
Friday New Product: Teensy, Ribbon Cable...
Today is Friday, and we are announcing a range of parts that might be helpful in your projects: Teensy-LC USB Development Board $11.65 Teensy-LC delivers an impressive collection of capabilities to make modern electronic projects simpler. Infrared Receiver 2.5-5.5V 38kHz $1.40 Compact IR Receiver for sensor applications. 2xAAA Battery Holder with Cover and Switch $1.50 […]
Solarbotics has been operating for more than 25 years, bringing electronics know-how and supplies to both the electronics professional and hobbyist. We'll be happy to help you too!
Solarbotics, Ltd. is not responsible for misprints or errors on product prices or information. For more information, please see our Terms and Conditions.
Warning: This product contains chemicals known to the State of California to cause cancer and birth defects or other reproductive harm.
Please visit www.P65Warnings.ca.gov for more information. This item was manufactured prior to August 31, 2018.