So today we have a nest. And some other things, like a programmer. If you take the programmer you can program the cleaning wire nest and the code will travel through all the little coils and come out the other end all transformed and golden too. It's almost like enlightenment. And then it will suitable […]
Monday Projects: Lasercut Stamps - Resea...
Solar botics
January 13, 2014
Yours truly is about to teach a mixed media class and wanted to try making some stamps to enhance my (and my students') collaging experience. Stamps are used to create background patterns and give interest to surface design in 2d mixed media techniques. There is a variety of stamps available both online and in craft stores, but like many other craft products, they are quite expensive and only have a limited amount of generic designs.
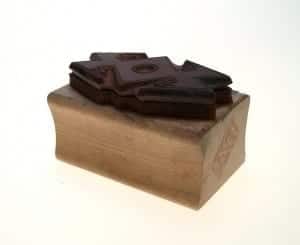
So what do I do? Make my own! And having a laser at hand is, well, handy… If only I were to engrave some material deep enough for it to produce a print, and then cut it out, that would be a stamp! I thought of different materials, such as plywood, acrylic (which we have many scrap pieces of), and tried both. Although plywood has a distinct and pleasant woodcut look when stamped with, it was still too hard to produce a consistent print, especially if the surface has some raised areas already, as a mixed media work often would: Laser engravable rubber would probably be more durable and flexible, but I didn’t have any on hand (have yet to try it). What I did have was some foam similar to craft foam, in 4.6mm thickness (see pic at the right). This particular foam comes from an embroiderer's supply and usually is used for creating 3D embroidery puff effect on hats, but it's characteristics are similar to any other craft foam. It is most likely EVA (ethylene-vinyl acetate).
 The next step was to make sure my material was safe to put in the laser (anything containing hydrogen or vinyl chloride produces fumes that can damage both the inside of the laser and the health of the person breathing in the fumes). So we did the Beilstein test to make sure the foam doesn't contain chlorides. The test consists of scraping the material in question onto a copper wire and burning it. In case chlorides are present the flame will have a distinct green colour. And it didn't. Phew, safe to laser…
Now, onto designing. I came up with some of my own designs, but orname.net is a pretty cool resource with a lot of free designs available for download if you are into patterns. Well, I am, hence the reference. I found that for my foam pretty much any image can be raster engraved, with a detail not smaller than 1.8mm. Once the design is laid out, time to fire up some lasering goodness. For foam I used the following settings: raster 100 speed, 50 power; vector 100 speed, 20 power. I will raise the cutting power and/or slow down the cut next time around, because the beam didn't quite penetrate all the way and I had to cut out the stamps by hand.

The foam material engraved beautifully, with enough raised edge to create a distinct print. The only limitation is size: the bigger the area, the more inconsistent the print will be, in terms of ink application and pressure on the stamp. I cut out an acrylic base to hold the stamp and attached it with Crazy Glue. The foam is probably less durable than laserable rubber that I mentioned earlier, but it holds ink well, washes off nicely and hopefully will stand up to some creative abuse!

MORE POSTS
Order Form Glitches
More teething problems! We're very aware of the secure server "security warning" that pops up when you click on an items "Add to Cart" button. Be assured, we ARE the appropriate receivers of the information. The problem stems from the ISP serving our website (Cadvision) having a secure server that doesn't correctly parse the names […]
Arc Reactor Kit Assembly Instructions
Arc Reactor Kit Build Instructions Here's a quick blog on how to assemble the Arc Reactor Kit - Limited Edition. 1. Remove brown paper from all 4 acrylic pieces - the pieces are actually clear, so remove all the paper from both sides.
Mark Tilden's 600 foot workbench
Well, it's more like a workbench 600 feet in the air. In his apartment. In Hong Kong. Nice view... Dig around the large image to see what cool stuff you can pick out. Gareth @ Make Magazine (where it was first posted last week) already found a "teacup Stirling Engine" at 10 o'clock (near the […]
Solarbotics has been operating for more than 25 years, bringing electronics know-how and supplies to both the electronics professional and hobbyist. We'll be happy to help you too!
Solarbotics, Ltd. is not responsible for misprints or errors on product prices or information. For more information, please see our Terms and Conditions.
Warning: This product contains chemicals known to the State of California to cause cancer and birth defects or other reproductive harm.
Please visit www.P65Warnings.ca.gov for more information. This item was manufactured prior to August 31, 2018.